I overwintered one tomato plant and all my bell pepper plants in the aquaponics greenhouse. This is what they looked like in May of this year (more than 12 months old). I wasn't certain in May if the tomatoes would set fruit. They had plenty of flowers but no fruits.
I am not actually sure if the tomato didn't eat any visitors to my greenhouse (just kidding) :-). That is one plant.
This last weekend I harvested about 40% of the bell peppers (all the red ones, and many larger green ones). While trimming back the tomato plant I also noticed that it had set some fruit.
The smaller peppers were perfect for BBQ skewers.
Conclusion, yes overwintered tomatoes and bell peppers will yield. The bells are yielding very well. It will remain to see at years end if the tomato yields well. The tomato plant is certainly very healthy and is a good anchor for my water filtering needs.
Monday, July 9, 2012
Converting Outdoor Transformer Lighting to Solar (p1)
I use 3x 18W lights to decorate my front yard. This is a total of 4.5A at 12v. During a recent visit to Anchor Electronics (www.anchor-electronics.com) I found blade style LED high power LED lamp assemblies. These lamps are built on a PCB consisting of 6 LEDs, a discrete rectifier (to prevent polarity on connection), and a power management chip. My immediate thought was to convert my 18W lamps to this LED lamp. Each lamp uses 20mA. So in total my yard lighting would be 60mA instead of 4.5A. This is more supportable with a battery backed solar setup.
I started the experiment of determining if this would work by converting one burned out bulb to take this lamp. The following pictures show the steps but read the end instead of following this. First I taped up most of the glass of the bulb. Using a plastic wrap I made a base to hammer the bulb to break the top of the glass (without the base, the actual base of the bulb would get damaged). Next I uncrimped the tungsten and crimped on the pigtails of the LED lamp holder. I solder gobbed the crimp connection (I believe in belts and suspenders for my electrical connections). I had o solder gob instead of solder because the tungsten carrier is not easily soldered to. Finally I filled in the space in the lamp with non-conducting plumbers putty. Installed the LED lamp and fired away. OK, it took more debugging to get this to work as it turned out that pushing the LED lamp completely into the holder shorted the diodes and prevented operation -- so the LED lamp assembly needs to be pushed in but not all the way.
As it turns out this worked very well. The 20mA unit was about 75% (qualitative) as bright as the 18W incandescent bulb.
If you want to do something like this, an easier way would be to source the parts from:
http://stores.ebay.com/Auto-Gangster-2009?_trksid=p4340.l2563 -- i ordered parts from here
http://stores.ebay.com/id=1007915828 -- have not ordered from here
http://www.superbrightleds.com/ -- have not ordered from here
After I get my COTS lamps, I will work on converting the transformer system into a solar powered setup instead of mains powered. Stay tuned.
I started the experiment of determining if this would work by converting one burned out bulb to take this lamp. The following pictures show the steps but read the end instead of following this. First I taped up most of the glass of the bulb. Using a plastic wrap I made a base to hammer the bulb to break the top of the glass (without the base, the actual base of the bulb would get damaged). Next I uncrimped the tungsten and crimped on the pigtails of the LED lamp holder. I solder gobbed the crimp connection (I believe in belts and suspenders for my electrical connections). I had o solder gob instead of solder because the tungsten carrier is not easily soldered to. Finally I filled in the space in the lamp with non-conducting plumbers putty. Installed the LED lamp and fired away. OK, it took more debugging to get this to work as it turned out that pushing the LED lamp completely into the holder shorted the diodes and prevented operation -- so the LED lamp assembly needs to be pushed in but not all the way.
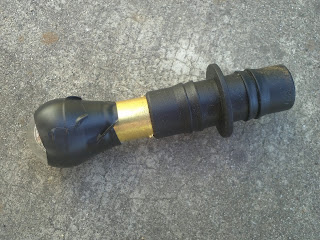
As it turns out this worked very well. The 20mA unit was about 75% (qualitative) as bright as the 18W incandescent bulb.
If you want to do something like this, an easier way would be to source the parts from:
http://stores.ebay.com/Auto-Gangster-2009?_trksid=p4340.l2563 -- i ordered parts from here
http://stores.ebay.com/id=1007915828 -- have not ordered from here
http://www.superbrightleds.com/ -- have not ordered from here
After I get my COTS lamps, I will work on converting the transformer system into a solar powered setup instead of mains powered. Stay tuned.
Sunday, March 4, 2012
Wine Cellar Update
Operating within design parameters. I keep it at 58F. Duty cycle is low. The left view is the cork encrusted door. We'll see what the duty cycle gets to in the summer months.
Previous posts:
http://wolfenhawke.blogspot.com/2011/10/wine-cellar-update.html
http://wolfenhawke.blogspot.com/2009/08/update-on-wine-cellar.html
http://wolfenhawke.blogspot.com/2008/09/finished-conversion-of-unused-closet.html
Previous posts:
http://wolfenhawke.blogspot.com/2011/10/wine-cellar-update.html
http://wolfenhawke.blogspot.com/2009/08/update-on-wine-cellar.html
http://wolfenhawke.blogspot.com/2008/09/finished-conversion-of-unused-closet.html
Night Fennel harvest
I learned from UC-Davis that Fennel root grows well in California. I planted this from seed in the greenhouse over the winter. This is the second harvest of my roots. This done at night while I was cooking some curry. The root can be cut into 1" slices and baked with olive oil and balsamic vinegar. The stalks can be cut and used like a feathery celery. I cut stalks up to 1cm lengths and put half of one roots worth in to a curry. The baked roots are delicious and all the parts have a slight anise flavor.
Tuesday, November 22, 2011
Gazebo to Greenhouse: Insulating and doorway
I am going to describe the steps and techniques I used for the conversion. As usual, if you want more details or explanations on certain items just drop me an email.
The first step is ensuring the gazebo framework is solid. My frame was already bolted down to a concrete slab using the screw holes as part of the frame. So my first step was to go around and using "liquid nails" adhesive to solidify any portions of the frame metal that had rust holes. The rust I had to deal with was very minimal and limited to one side so the frame was still very solid.
Second I chose one of the entryways to the gazebo to my doorway. I shored this up with 2x4 pressure treated lumber on the side. This was put in such that it was tight so that there was tension on the frame. It was also screwed into the metal framework. The picture also shows the 2x2 framing (light colored wood) in place that would become my door. The purpose of using wood was to strengthen the frame to be used as door frame, and also to provide wood to screw the door hinges into. From this picture you can see that the gazebo top "second story" canvas frame has been removed to allow a smooth roof install later.
Third, I used 1/2" foam insulation on the lower 4 foot of the frame. This went all the way around except of course the chosen doorway. This material has a foil layer on one side and this was placed facing outside. The material was attached to the frame by twist ties, and I also used liquid nails adhesive from the foam to the metal framework. Note that to prevent the twist ties from being pulled through the foam, some form of stop has to be used to apply pressure on the twist tie on the outside. I used pieces of scrap plastic and also 1/2" irrigation hose for this purpose.
Other posts in this series:
Pictures More Pictures
Start (this page)
Insulating and Doorway
Upper Walls
Door
Roofing
Tuesday, November 8, 2011
Making a greenhouse from a metal gazebo frame
The next few entries will detail the conversion of a metal frame gazebo into a greenhouse. This is how I built my greenhouse for my aquaponics setup that I have been writing about. It all started with a 10x10 DC America gazebo frame similar to the picture below. After a few years of use, the canvass covering disintegrated. Starting cost of the gazebo was about $300 new.

The actual view that to start is below:
Other posts in this series:
Pictures More Pictures
Start (this page)
Insulating and Doorway
Upper Walls
Door
Roofing
The actual view that to start is below:
Other posts in this series:
Pictures More Pictures
Start (this page)
Insulating and Doorway
Upper Walls
Door
Roofing
Sunday, October 30, 2011
Subscribe to:
Posts (Atom)


