
Sunday, March 4, 2012
Night Fennel harvest
I learned from UC-Davis that Fennel root grows well in California. I planted this from seed in the greenhouse over the winter. This is the second harvest of my roots. This done at night while I was cooking some curry. The root can be cut into 1" slices and baked with olive oil and balsamic vinegar. The stalks can be cut and used like a feathery celery. I cut stalks up to 1cm lengths and put half of one roots worth in to a curry. The baked roots are delicious and all the parts have a slight anise flavor.

Tuesday, November 22, 2011
Gazebo to Greenhouse: Insulating and doorway
I am going to describe the steps and techniques I used for the conversion. As usual, if you want more details or explanations on certain items just drop me an email.
The first step is ensuring the gazebo framework is solid. My frame was already bolted down to a concrete slab using the screw holes as part of the frame. So my first step was to go around and using "liquid nails" adhesive to solidify any portions of the frame metal that had rust holes. The rust I had to deal with was very minimal and limited to one side so the frame was still very solid.


Other posts in this series:
Pictures More Pictures
Start (this page)
Insulating and Doorway
Upper Walls
Door
Roofing
Tuesday, November 8, 2011
Making a greenhouse from a metal gazebo frame
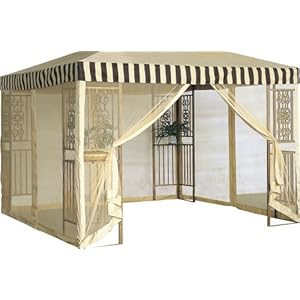
The next few entries will detail the conversion of a metal frame gazebo into a greenhouse. This is how I built my greenhouse for my aquaponics setup that I have been writing about. It all started with a 10x10 DC America gazebo frame similar to the picture below. After a few years of use, the canvass covering disintegrated. Starting cost of the gazebo was about $300 new.
The actual view that to start is below:


Other posts in this series:
Pictures More Pictures
Start (this page)
Insulating and Doorway
Upper Walls
Door
Roofing
The actual view that to start is below:


Other posts in this series:
Pictures More Pictures
Start (this page)
Insulating and Doorway
Upper Walls
Door
Roofing
Sunday, October 30, 2011


Sunday, October 16, 2011
Cee Gwa Harvest in Pics
Harvested today.

These were growing on vines that had "escaped" from my greenhouse walls and were climbing on the adjacent fence. Couple yellow overripe ones, but plenty of good ones here.

These ones were from inside the greenhouse. Have about another 6 there and its done.
Wine Cellar Update
Cooling system upgrade -- converted to a true wine cellar cooling unit.
The 12v power supply driving the cold air fans failed on my cellar cooler. It was at least a day before I found out. After finding the fault, I replaced the supply. The system was not as efficient though as it had trouble hitting the 66F that I kept the cellar at. So it was time to replace the cooling system as the entire project had been proven successful.
I first got a CRU 4200. This unit came and during the bench test I was only able to power from the side plug but it did blow air. Upon opening the lid, I found the rear plug wires disconnected, and worse, the entire high pressure fan system was toast. Presumably damaged during shipping but the box was in good shape!!??
Anyway, I changed the order to a WhisperCool 3000. Made the final cut in the wall (don't do this until you have bench tested!), and installed the unit. I had to run a separate power line for the unit, and chose to use a 20A circuit -- you may be able to use 15A -- the user manual says 20A, but the unit has a label that notes max 15A protection. My WhisperCool came with some errors in packing -- I had an extra temperature sensor that didn't even belong to this model, the foam weatherstripping were all one size instead of mixed, the bench test plug was missing, and the owners manual was for a different system (a split air conditioning system). It turns out none of this mattered much as the manual is available on the net, and the unit can be bench tested with the actual PDT sensor -- you don't need the test plug. The manufacturer (WhisperCool) was very helpful as was the seller (WineEnthusiast.com). The latter through the whole purchase, refund and substitute and also in getting me in touch with the manufacturer.
Because the WhisperCool will allow me to lower the cellar temp to 55F, I increased insulation. This was accomplished by drilling holes and filling my indoor door with foam, and also by installing 1" foam insulation on the inner side of the door. My door is a small non-standard closet door, and also I didn't want to get rid of the insulating cork decoration I had installed on the outer side.

View from the garage -- you can see the older cooling system on the bottom right (still there for backup)

View from inside the wine cellar. I had to cut out 9 bottle spots to accommodate the cooler. The display is when first turned on. It took less than 12 hours to reach 55F and is holding fine. Now I need to determine the duty cycle to see how reasonable the insulation is.
Sunday, October 9, 2011
Late Season Results
My overgrown greenhouse. The Cee Gwa is liking the cooler weather and really setting fruit. I will have a lot of vegetation to clear though once the harvest is done.


Even though I have ignored my outdoor garden for the most part this year, it still likes me :-) This is a cherokee purple grown in a large container (old blue recycling bin, the type that's not used anymore).


Cee Gwa grown in aquaponics greenhouse in hydroton substrate. Yes, these are the same beds that I show in earlier posts with seedlings at the beginning of the year.

Even though I have ignored my outdoor garden for the most part this year, it still likes me :-) This is a cherokee purple grown in a large container (old blue recycling bin, the type that's not used anymore).
Subscribe to:
Posts (Atom)